When is the last time you updated your profile photo? Worried you need a bunch of gear and a professional photographer?
You can absolutely get a great new headshot in a home photo shoot with just your smartphone!
Here’s all you need:
- daytime when there is natural light coming in from outside
- a smartphone with a camera.
- Bonus: It’s not required, but if you’re taking your own photos, you can use a smartphone tripod on self timer mode as well.
I sat down with my photographer extraordinaire, Maggie Kirkland, to ask her about how everyone can do a home photo shoot. As we all spend more and more time at home working remotely, we need an easy way to do something proactive for your LinkedIn (or Facebook photos or dating profile) pics.
Watch our video below to learn how you can do a home photo shoot!
This article outlines her insider tips to an easy home photo shoot (and a great new headshot).
If you need a profile photo refresh, and you have 15 minutes and a smartphone, you can take your own amazing headshot right at home! Here are 5 easy steps for taking a portrait of yourself, whether in selfie mode, or if you have a helping hand to take a photo of you.
Grab your smartphone and try these out!
Step 1: Find the Light
The best lighting for taking your own profile photos will always be natural lighting. Surprised? You do NOT need fancy lights! Yes, really!
What I mean by “natural lighting” is that it is coming from outside, and not from anything powered by a battery or electricity. No cords, no batteries, just light produced by the sun.
And you do NOT need to be outside, in fact we will only be using inside lighting in these examples.
It’s also completely okay to do this on a cloudy day; there will still be enough light coming in from a window to work with.
Look around and locate the best light in your space. It will be near a window.
Now is the trickiest part of portrait photography: getting the lighting right. Once you’ve found the best lighting, you need to place yourself in it to make sure it looks the best on your face and torso for the profile photos you are taking.
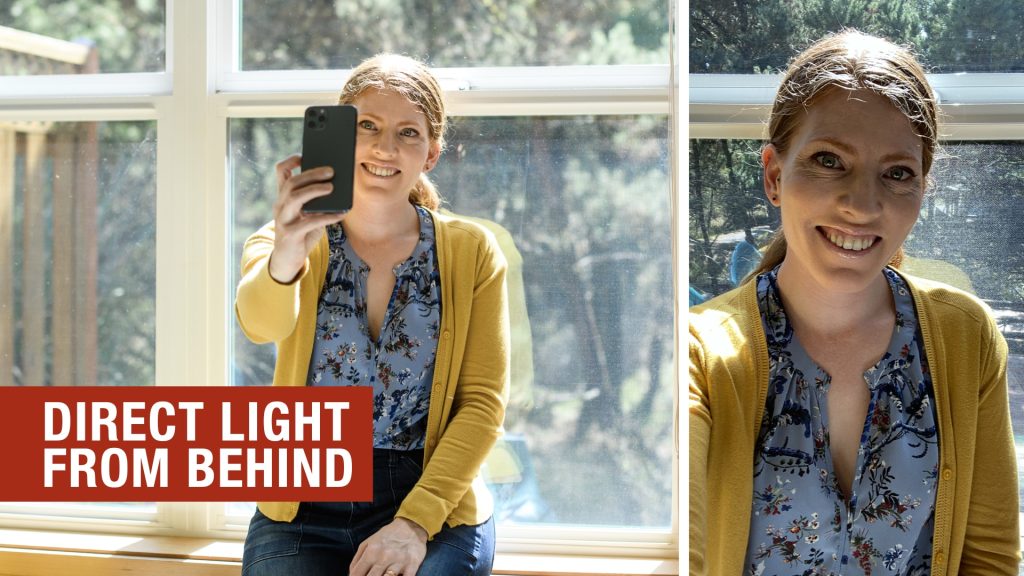
The great news is once you’ve learned to see and create good lighting, it’s a hard thing to unlearn. Pay close attention to this step, so all your future selfies and photos of your loved ones will be extra well lit!
You’ll want indirect, diffused, and flat light for portraits.
This means you want to be as close to the bright light as possible, but not in it. You don’t want any sunshine rays touching your face, your torso, or your back. That type of harsh lighting will be too bright and will cause troubles. Direct sunshine:
- is unflattering
- often exaggerates all the things we don’t want exaggerated, like wrinkles and under-eye bags
- is too harsh
Direct sunlight will also cause almost anyone to squint. Your eyes are one of the most important features in a profile photo, so squinting is not what we want to see.
How can you diffuse the light?
- Cover the window: If you have light and sheer window coverings, you can draw the coverings closed to diffuse the light. You could also use a white sheet or a shower curtain to diffuse light.
- You can close blinds until no direct sunshine is touching your face or torso.
- You can also back up from the window just far enough so no direct light is touching you. You’ll still be in the brightest part of the room, but without the harsh sunlight.
What I mean by “flat light” is that the light is evenly across your face and torso.
It shouldn’t be brighter on one side of your face and darker on the other. Be careful not to block the light touching your face with your hand holding the phone. If someone else is taking your photo, make sure they’re not blocking some of the light as they take your photo, if they are, they should be able to adjust a step or two to make sure you’re getting all the best light.
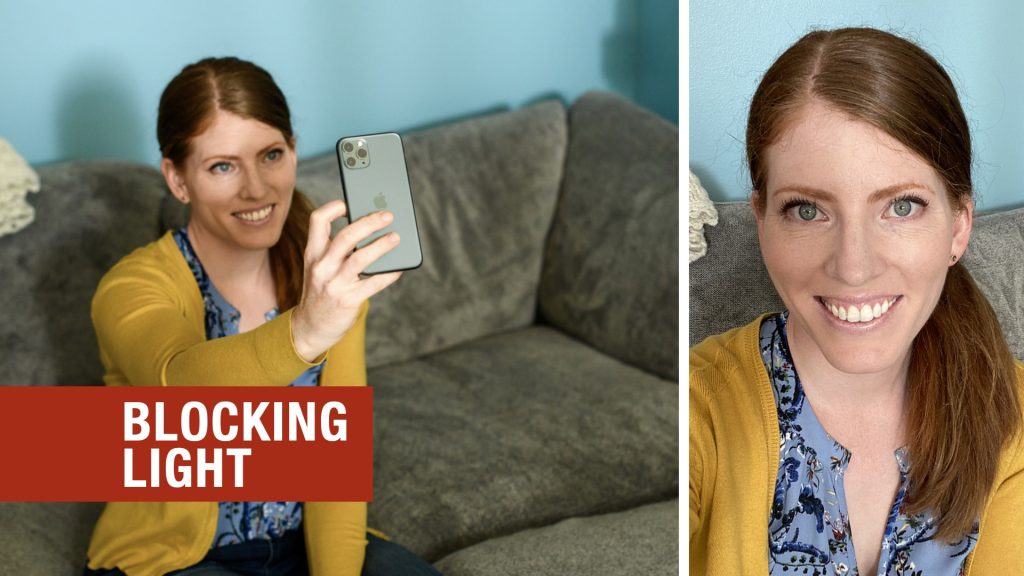
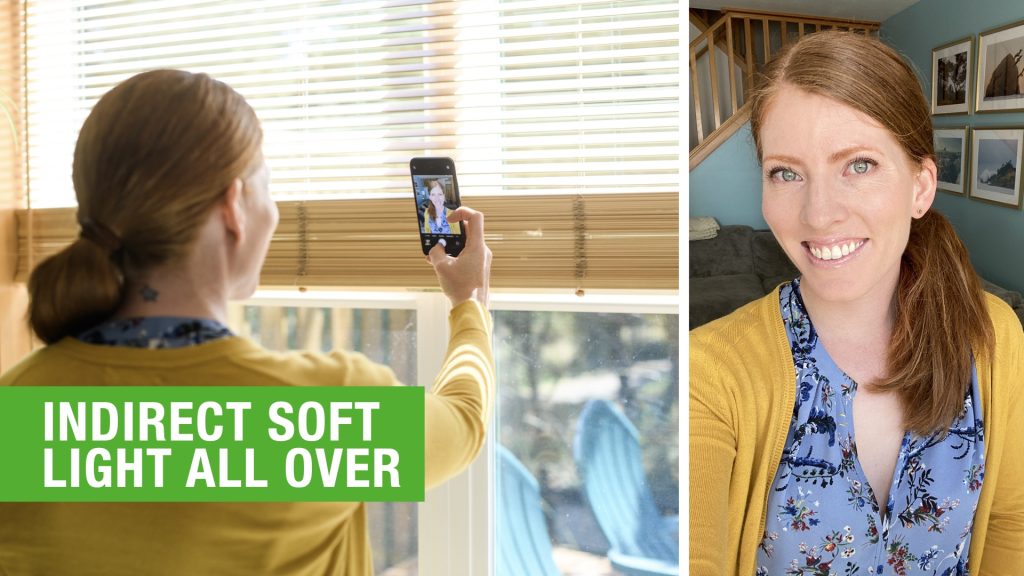
The last thing you will need to pay attention to is the sparkles in your eyes. Yes, really!
The closer you are to the best lighting for your portrait, the more you will see sparkles in your eyes. The more sparkles of light, the better. Your eyes are important in these photos, so making sure your eyes are well lit, bright, and sparkly will ensure you’re looking your best! If the sparkles aren’t very sparkly in your eyes, try finding a brighter window, a brighter space, or waiting until there’s more light shining in.
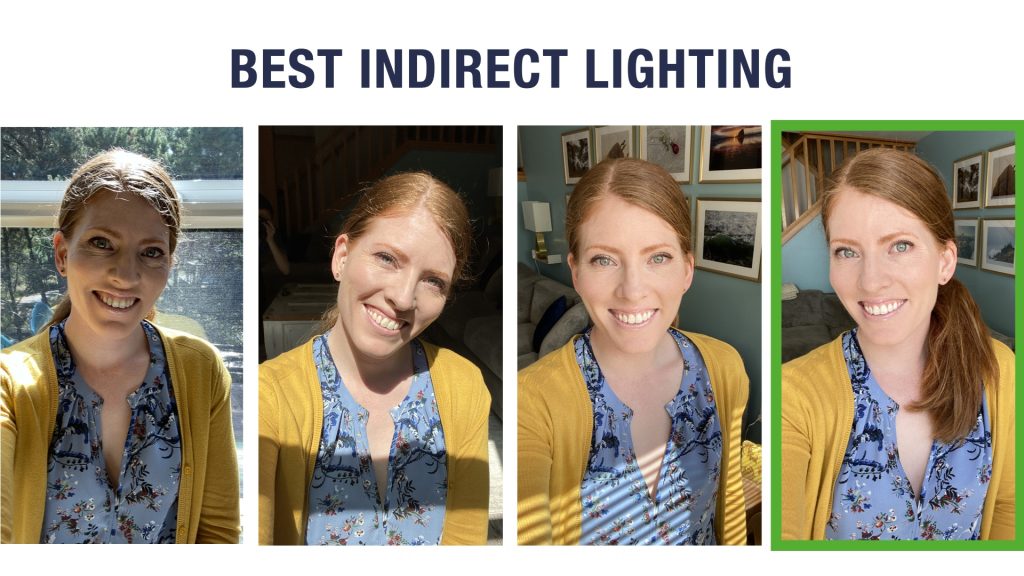
Step 2: Prepare Yourself and the Space
Clean up the space and anything that might be in the background. If there are toys on the ground, or pillows that need to be put back into place, or a stack of mail on the counter, make sure all of it is cleaned up or removed when possible. It is okay to have items such as a couch, a lamp, or a bookshelf in the background; just make sure they look tidy and neat.
Turn off the lights. I know this sounds counterintuitive, but it is important!
If you have any lamps, overhead lights, anything with a bulb and electricity or a battery, turn it off before you take your photos. Many light sources cast a yellow or orange hue which isn’t flattering for portraits, we want to stick to strictly natural lighting from outside.
Now that your space is ready, and you have the lighting dialed in just right, prepare yourself for your photoshoot!
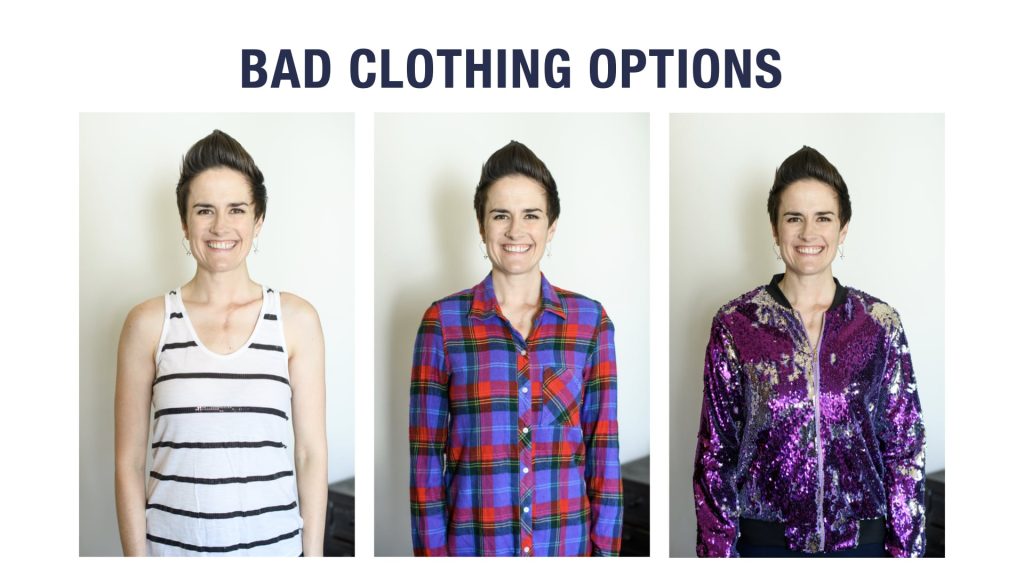
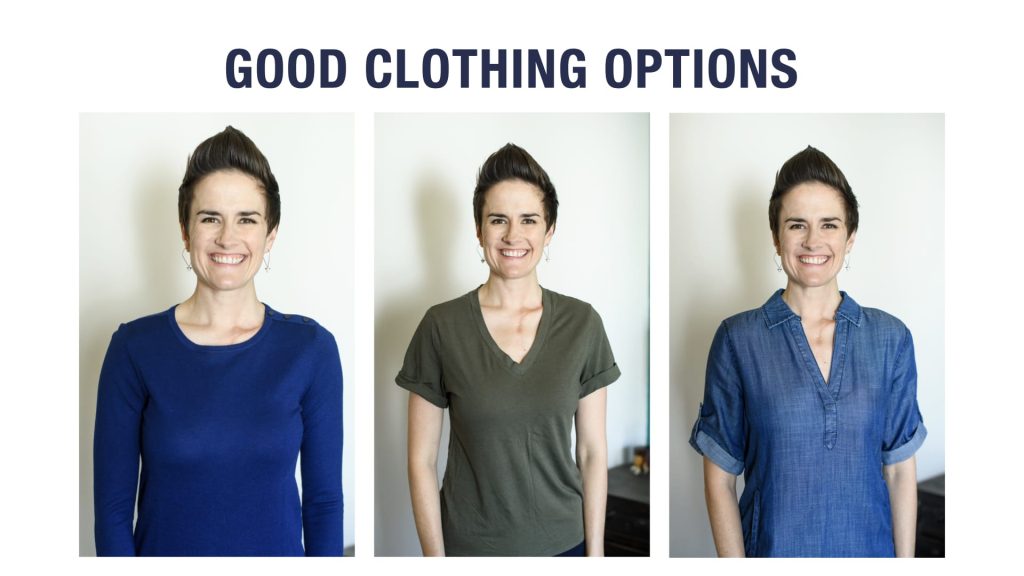
Make sure you wear something that fits you well and doesn’t have bold patterns, materials, or harsh colors. For instance, neon orange is not a great color to wear in a portrait photo, but deep jewel tones, or simply black and white can be great options for clothing colors. Patterns can work as well, but try to avoid any that become too bold and distract away from your face and eyes. In the sample photos we did for these five steps, I wore a cardigan on top of a patterned shirt in order to tone down and cover up some of the “noise” of the pattern.
Step 3: Take the Photos
Now for the fun part! It’s time to take the photos. You can:
- Use what your Momma gave you—reach your arm out and take your own selfies.
- Set up a tripod and use the self-timer mode.
- Have someone else snap some photos of you in that perfect lighting.
The tip EVERYONE forgets:
Before you take photos, make sure to clean the lenses on your smartphone.
If you’re taking a selfie, the camera is typically on the top of the phone, right above the screen. If someone else is taking photos of you, the lens, or lenses, will be on the backside of the phone (not the side with the screen). Use a clean towel, a microfiber cloth, or even a clean shirt to ensure the lens is totally clean. Do this every time you take photos! Just placing your phone in your pocket can put a dirty smudge on your lens that can make your photos look like they’re straight out of a ‘90s soap opera.
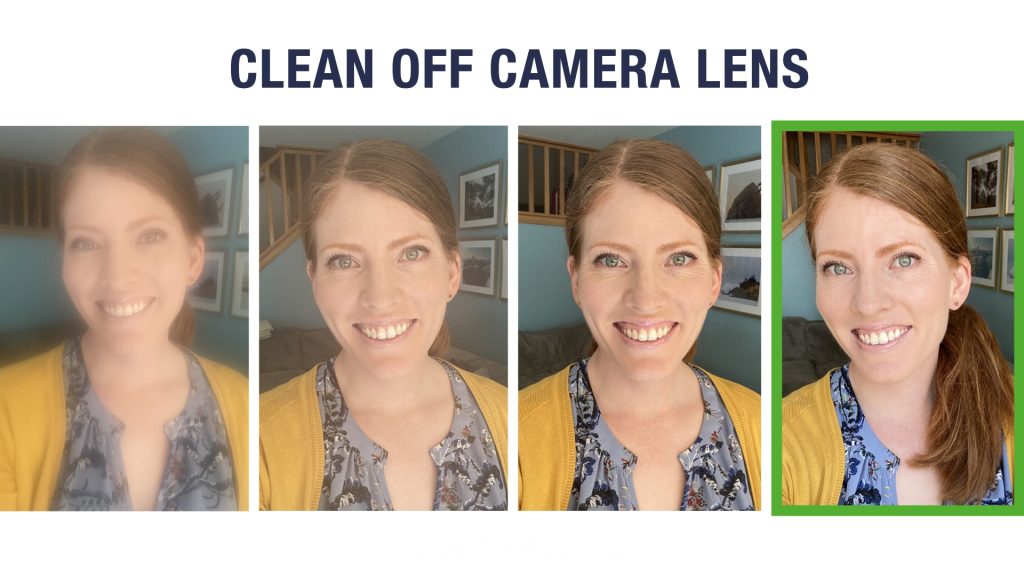
Look directly into the lens you just cleaned. This is more challenging when you take a selfie because you’ll want to check the screen to make sure you look good, but once you’ve got everything dialed in just right, make sure to look right into the lens when you take the photo.
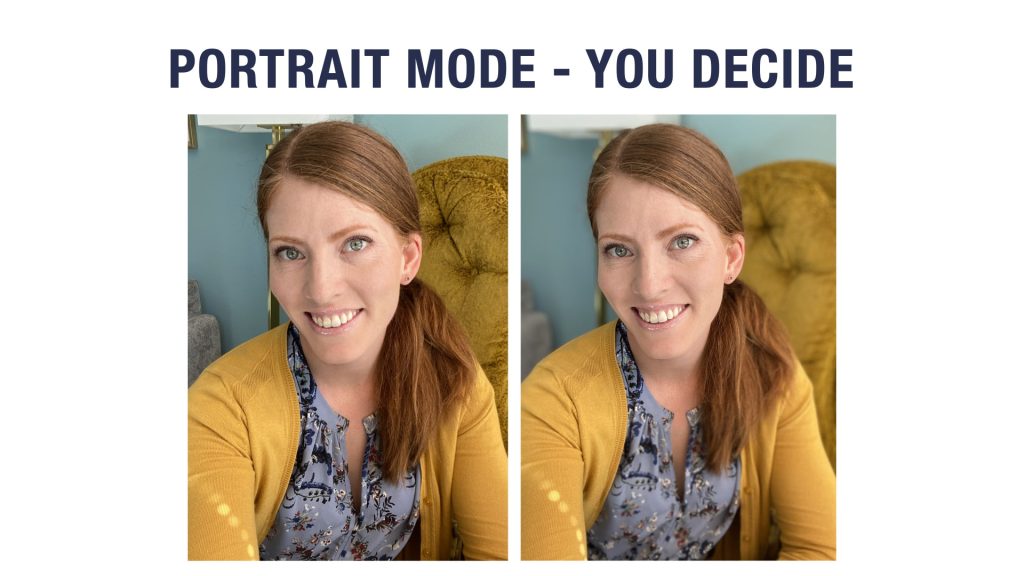
I’m not totally sold on portrait mode settings on smartphones. In my opinion, they still have a look that is different than what a real camera lens creates, which might make your photos look a little less professional by saying “I took this with my smartphone.” Sometimes it works, but sometimes it looks like it’s trying too hard yet isn’t quite the real deal. I’m hopeful portrait modes will continue to get better with every new phone generation, but for now I will leave it up to you to decide if you like how it looks or not.
It can be really helpful to use portrait mode to blur out a busy and cluttered background, so in that case, use it as needed!
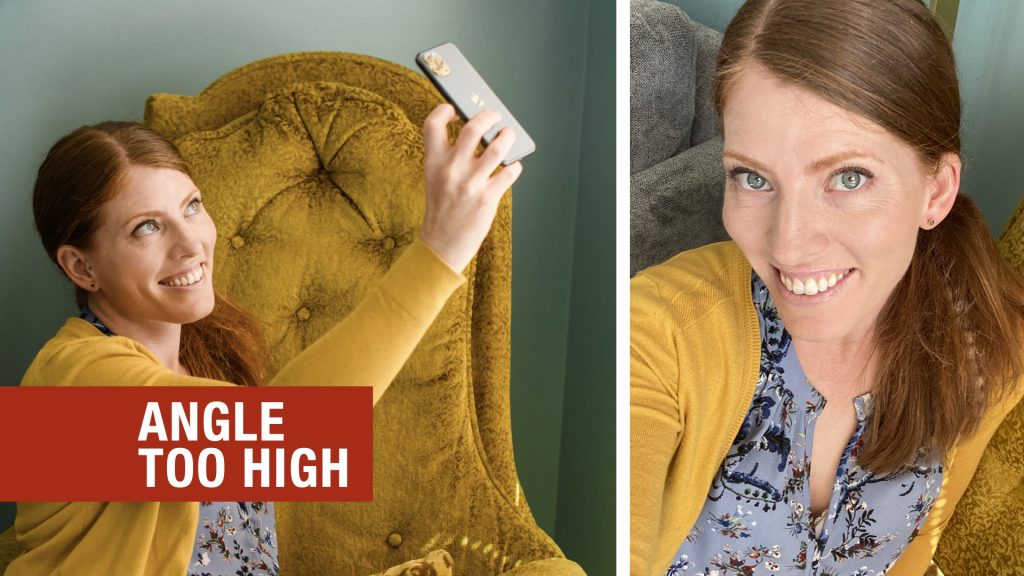
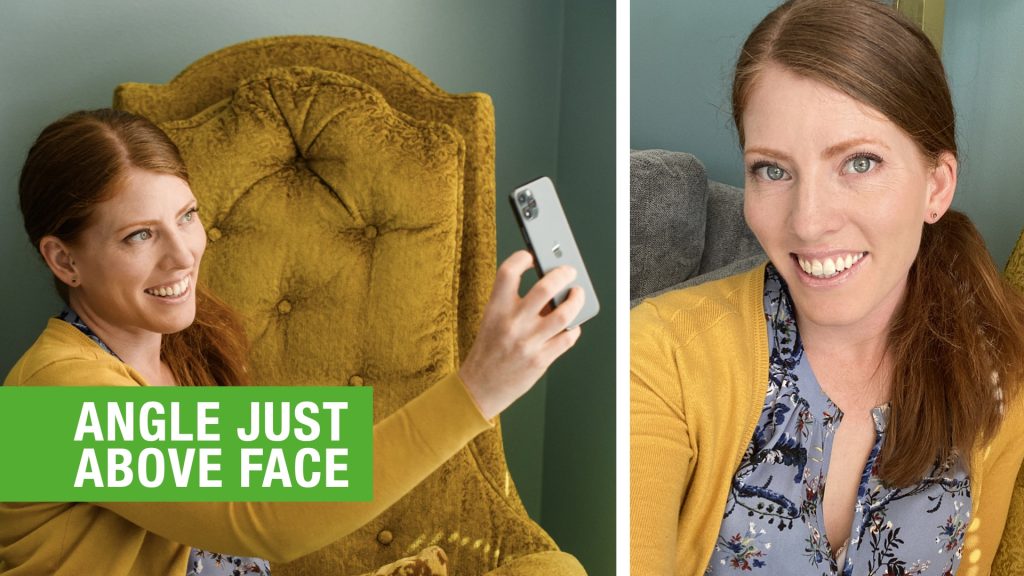
One aspect most people intuitively get right is that higher angle.
The camera needs to be slightly above your eye level to get the best, most flattering angle.
When you look around at people taking selfies, you’ll often see their arms held up high with their smartphones looking down at them, this is exactly what I want you to do too! If someone else is taking your photo, make sure they’re holding the phone slightly above your head.
Beware! If the angle gets too high, it starts to exaggerate your eyes and forehead, and will minimize the rest of your features. Photos taken at too high of an angle won’t look like the real you. Make sure to keep the angle fairly subtle. This also applies to using a tripod. Make sure the angle of the tripod is just slightly above your face looking down.
Step 4: Filters, Apps and Editing
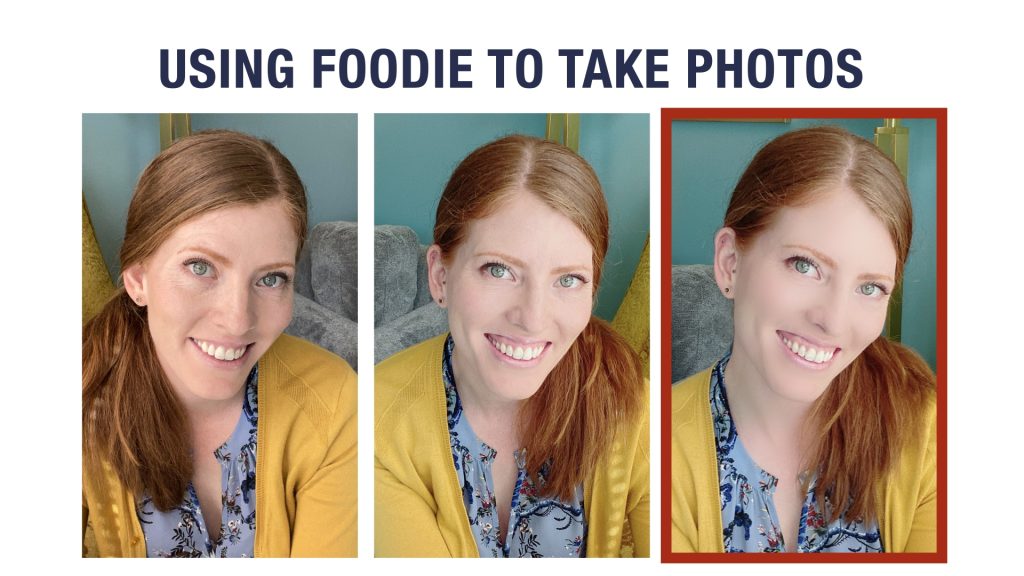
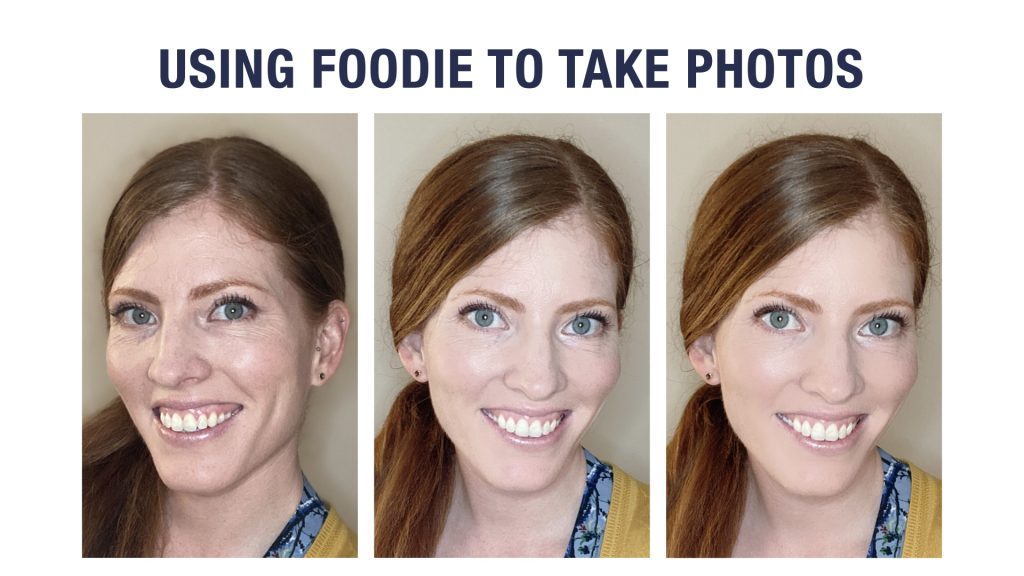
You can use apps to take photos with filters already applied, or you can also use apps to edit photos after you’ve taken them. It depends on the app I’m using, but I do both. I like to use the free app Foodie to take photos. It smooths out skin and wrinkles, reduces bags under eyes, and it even brightens eyes and teeth.
I never use any of the filters at their full power because it looks really plastic and fake, but I’ve found using them in smaller amounts can keep me looking like myself, with a few things smoothed and brightened up just enough.
This first set of photos show how I look when the skin-smoothing filters are up all the way (far right photo) and then the second set of photos shows the progression from no Foodie filters to just enough
Check out how my skin tone was smoothed out, my wrinkles reduced, and my eyes and teeth brightened up! It even made my hair a bit more colorful too.
I’ve used VSCO and Google Photos apps to edit after I take a photo with my smartphone. They’re good for popping color, exposing just right, and cropping in if needed. Apply the same rule of thumb here too: never use any filter at its full strength. You don’t want to shout that you’re using editing apps, but you can use these just enough to make your photos pop and look more professional without going too far.
Step 5: Best Poses and Things to Avoid
You already learned that the best, most flattering angle is to have the camera slightly above your face. Why is that?
- It helps to make your eyes appear bigger.
- It’s easier to hold the phone.
- It reduces double chins and, at the right angle, can hide them entirely.
Another way to reduce what people call a “double chin” is to pretend to place your chin on a little shelf just in front of your face. Reach out your chin and place it on that shelf. Pretend it is ever so slightly below where your chin naturally is. Don’t go too far with your chin out and down or you might come across a bit creepy!
Why does this work? When we smile and laugh naturally, oftentimes our chins go up and back. The backward motion is what causes extra chins, so by placing your chin on a little (invisible) shelf in front of you and keeping it there, you wont be jetting your head back when you smile and laugh in photos.
To create a great natural smile, I always recommend playing your favorite music, doing a few small dance moves to get some joy flowing, and thinking of someone you love or someone who always makes you laugh. You can also think of a pet or your favorite celebrity crush. All of these can bring a great natural smile to your face for photos. If you get too silly, that’s great! The moments and seconds right after a totally silly, laughing, dancing outburst tend to make the most relaxed genuine smiles. Go too far, and then take photos on your way back to being “normal.” Stiffness and a lack of movement will often lead to fake smiles. Have fun with this and people will feel you when they see your photos.
How to Pose and Increase Your Confidence
- Open is best! Think about your body as a representation of your open-mindedness. Crossed arms, or holding a notebook or purse in front of you makes you look blocked and closed.
- Angle towards the camera. We like to have people fully facing us, so try to angle your body towards the camera.
- Be very careful with ornaments. Hats, glasses, lots of jewelry can distract people from who you are.
Here are some more resources for you:
- Get some ideas for poses with our 30 Ideas for the Perfect Photo Shoot.
- Not sure how to feel authentic in front of the camera? Here’s how to look and feel more confident.
- We analyzed hundreds of photos and researched how to take the perfect selfie.
This is the perfect time to update that photo!
If you want to learn more from the amazing Maggie Kirkland, check out her website, and Instagram.
More about Maggie Kirkland: Maggie is a professional photographer and online educator who specializes in working with entrepreneurs, speakers, influencers, authors, coaches, and trainers. She is passionate about helping people tell their stories, share their ideas, and reach the right followers, students, and audiences.

Great Gift, thank you…!
Tried it out immediately.
Great Gift, thank you…!
Tried it out immediately.
Great Gift, thank you…!
Tried it out immediately.
Great Gift, thank you…!
Tried it out immediately.
Very useful tips. Thank you! I intend to retake my mediocre LI profile photo IF my professional hairdresser can return to work to give me a REAL haircut!
Very useful tips. Thank you! I intend to retake my mediocre LI profile photo IF my professional hairdresser can return to work to give me a REAL haircut!
Very useful tips. Thank you! I intend to retake my mediocre LI profile photo IF my professional hairdresser can return to work to give me a REAL haircut!
Very useful tips. Thank you! I intend to retake my mediocre LI profile photo IF my professional hairdresser can return to work to give me a REAL haircut!
Vanessa&Maggie! High level Masterclass! Thank you, so much.
Vanessa&Maggie! High level Masterclass! Thank you, so much.
Vanessa&Maggie! High level Masterclass! Thank you, so much.
Vanessa&Maggie! High level Masterclass! Thank you, so much.
Hi Vanessa and Maggie,
I like doing photography, but with animals and landscape, not so much with people or selfies. Your tips were thought provoking so I tried using the lighting tips in our lounge room to send my best wishes in a 10 second video to my Aunty in hospital on video.She lives half way across the country (Australia). After about 25 takes and learning to look at the small camera on my phone I sent our love in a 10 second clip. Thanks for your inspiration and tips
The only thing missing are tips for those of us who wear glasses. We want the sparkles in our eyes, not in the lenses.
The only thing missing are tips for those of us who wear glasses. We want the sparkles in our eyes, not in the lenses.
The only thing missing are tips for those of us who wear glasses. We want the sparkles in our eyes, not in the lenses.
The only thing missing are tips for those of us who wear glasses. We want the sparkles in our eyes, not in the lenses.